Tuesday, October 27, 2009

Foodie Feature

Due to a CRAZY busy Sunday, I am just now getting around to posting. Weekly meal planning is very important to me. It allows me to do my grocery shopping all at once and make sure my family is eating well balanced meals. I also enjoy trying out new recipes. I try to cook three new recipes each week. One tip I have for trying out new recipes is to have a binder to store all the recipes you want to try. When you are reading through a magazine or online and see a recipe you would like to try you can simply store it in your "Recipe Binder". Then, when it is time to make your weekly meal plan you can flip through all your new recipes. Some will be good and some as I have found will be BAD!

Weekly Meal Plan for October 26 - November 1
10/26 - *Work Night* Leftovers/Sandwiches
10/27 - Family Dinner at my Grandmother's
10/28 - Cavatappi with Roasted Tomatoes, Tossed Salad (I was supposed to make this last week but realized when it was too late that the tomatoes had to roast for 3 hours - oops)
10/29 - Rosemary Grilled Chicken Breasts, Caramelized Onion-Potato Gratin, Roasted Green Beans
10/30 - Dinner with Friends
10/31 - Trick or Treat Dinner with Family
11/1 - Corn and Bacon Chowder, Cheddar Biscuits, Apple Slices

Featured Recipe:


This is a recipe that comes from Cooking Light. It is quick and absolutely delicious. Mark and Belle ate a full plate of this and the leftovers were fantastic as well.

Ingredients:
1/4 cup all-purpose flour
1/2 teaspoon dried oregano
1/4 teaspoon salt
2 large egg whites, lightly beaten
3/4 cup panko (Japanese breadcrumbs)
4 (6-oz) skinless, boneless chicken breast halves (if your chicken breasts are thick pound them to 1/4 inch thickness)
2 Tablespoons olive oil, divided
Cooking spray
1/2 cup jarred tomato-basil pasta sauce
1/2 cup (2 oz) grated Parmigiano-Reggiano cheese
3/4 cup (3 oz) shredded part-skim mozzarella cheese

1. Preheat oven to 450.
2. Combine first 3 ingredients in a shallow dish; place egg whites in a bowl. Place panko in a shallow dish. Dredge one breast half in flour mixture. Dip in egg whites; dredge in panko. Repeat procedure with remaining chicken, flour mixture, egg and panko.
3. Heat 1 Tablespoon oil in a large ovenproof skillet over medium-high heat. Add chicken to pan; cook 2 minutes. Add remaining 1 Tablespoon oil. Turn chicken over; cook 2 minutes. Coat chicken with cooking spray; place pan in oven. Bake at 450 for 5 minutes. Turn chicken over; top each breast half with 2 Tablespoons sauce; 2 Tablespoons Parmigiano-Reggiano, and 3 Tablespoons mozzarella. Bake 6 minutes or until chicken is done.
(Yields 4 servings)

Be very careful when you are working with the chicken after the pan has been in the oven -- I burned myself twice.
I served this over whole-wheat spaghetti and a tossed light Caesar salad. I hope you enjoy this recipe as much as my family did. Leave me comments if there are any recipes you want me to try out or feature.

Now go... and cook!


post signature

Friday, October 23, 2009

Home How-To: Chalk It Up

Today I am going to walk you through making your own chalkboard. These chalkboards are great to use as memo boards, calendars, meal plans, etc. around the home. They can be made as cheap or as expensive as you want.

Supplies Needed:
Frame, Mirror or Plywood
Chalkboard Paint (This can be found at a craft store and can be found in spray paint or tub form. The spray paint is always black or green and the tub form comes in lots of different colors.)
Painters Tape
Roller paintbrush (if using tub of paint)
Chalk
Exacto Knife or sharp edge

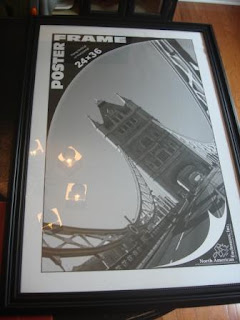
I found this frame on sale at Jo-Anns for 50% off. It was $25 with a discount.
If using a poster frame or mirror, the first step is to clean the glass with glass cleaner. If using plywood, sand it VERY smooth.
The second step is the tape your edges off using painter's tape.


Next, paint the first coat of paint on. It will look VERY thin and seem like it is not working "right". If using spray paint, follow directions on the can. Let this dry for 45 mins to an hour.


Paint as many coats of paint as needed until you are satisfied with the coverage. I found on my frame if I turned the printed paper over underneath the frame to make the background solid it looked MUCH better. I ended up doing 4 coats of paint and only used half a tub of colored chalkboard paint.

Once you are satisfied with the coverage of paint allow it to dry overnight. Next take an exacto knife or sharp edge and run it around the entire edge of your frame/mirror. Then remove the tape slowly. After the tape is removed, use the side of a piece of chalk to rub all over the chalkboard. This primes the chalkboard. Wipe all the chalk off and it is normal if some of the color of the paint is on your towel with the chalk - do not rub vigorously though.


Have fun and be creative with what you put on your chalkboard.


Lastly, hang it in the place that it will be of most use to you. We use our chalkboard for reminders and a weekly bible verse, so we hung it on the stairs going to the garage.


Please comment if you have any questions or problems making your own. I can't wait to see you all posting pictures of your own chalkboards. Please feel free to comment as well if you have any suggestions for Home How-To!
Now Go....And CREATE!

post signature

Tuesday, October 20, 2009

I'm Baaaaaaack!

So after a much needed blogging silence. I am back and better than ever. I am going to take a new direction with my blog. I will feature great activity ideas to do with your children, wonderful recipes to cook with your children, etc. I want to create a community where we as mothers can encourage each other and help fill our days with things that enrich our children's lives.

The schedule will look something like this:

Sunday: Weekly Meal-Plan/Recipe of the Week
Tuesday: Activity Ideas
Thursday: Home How-To

I will mix in some other things here and there. I hope this is something that you enjoy and get ideas. Please submit feedback at any point and let me know if there are particular topics or ideas you want me to cover.

To start things off I am going to talk about planned activities with toddlers. In our house we encourage free play because I think that it fosters the development of a child's imagination. I love watching Belle slowly learn to play "pretend" because I can remember all the many adventures I took myself on. Belle goes to "school" on Tuesdays and Thursdays, so I make a plan for activities on Monday, Wednesday, and Friday. Although I plan for those days sometimes things change and we don't do them those days or save things for Saturday with daddy. The best advice I can give is to not over plan and try to do too many activities at once. It is very important to remember the attention span and skill level of your child.

Last week our activities centered around apples. I try to adapt Belle's activities to supplement her school curriculum. They do so many fun things about fall so we are riding that theme out in our house. Last week we read a book called Under the Apple Tree. It is a very simple story about all the things that you can do/see under the apple tree. We then had an Apple Hunt where I hid two red and two green apples and we went hunting for them around the house. This activity incorporated counting and colors. Very simple but very entertaining for an almost two year old.

Another activity we enjoyed was an Apple Investigation. We took one of the red apples and one of the green apples and looked and felt the differences between the two. We talked about the color differences and texture differences. I then cut them into half where you could see the seeds and core. This allowed us to see what the inside of the apple looked like. I then cut the green and red apple into slices so we could smell and taste the differences between the red and green apples. This helped with learning about senses and differences. It also made for a great snack activity.

We are going to follow up this week with another book about apples. We are going to do Apple Stamping where you cut an apple in half and use them as stamps with paint. Belle and I also plan to make some Apple Chips for a snack activity. I will post some pictures at the end of the week.

I hope these ideas have inspired you. I love sitting down on Sunday and planning out some fun learning for the week. Another great resource is Productive Parenting. It is a website that will send you a daily age-appropriate activity email.

Stay Tuned:
Friday's Home How-To: Make Your Own Chalkboard.
P.S. I did lose the 10 lbs.!!

post signature